Introducing the New iplicit Mobile App
We’re excited to announce the release of our new iplicit Mobile App, built to make expense submission and approval faster, simpler, and more intuitive — wherever you are.
Designed from the ground up with speed, ease of use, and reliability in mind, this app delivers the best possible experience for managing expenses on the go.
Why a new app?
We’ve listened to your feedback — and we know that submitting and approving expenses are among the most important mobile tasks.
That’s why our new app focuses entirely on making it easier to capture receipts, submit claims, and approve expenses, all from your phone or tablet.
This is just the beginning — we’ll continue gathering feedback and making ongoing improvements to enhance your mobile experience.
What does this mean for you?
- If your main need is expense submission and approval, the new app is the best choice.
- If you also use other mobile features not yet available in the new app, you can continue using the existing app alongside it. Both apps will remain available during this transition period.
Get started today
This new app will be available by end of December 2025. Prepare to switch to the new version and start enjoying faster reimbursements, fewer lost receipts, and smoother approvals across your organisation.
[Learn how to use the new app, watch the demo: New iplicit Mobile App (for expenses)] or follow the guidance below.
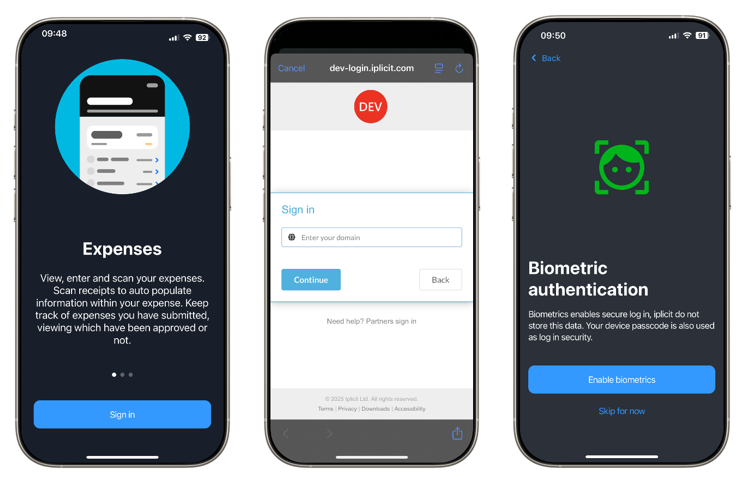
1. Signing In
- Download the app from the app store, then open it.
- Click the Sign in button.
- A new pop up will appear where you can log in using your domain, username and password (same way you would sign in via the browser).
- You have the option to enable biometrics authentication. Note: users are required to set a 6-digit app passcode, even if they choose to use biometric authentication (e.g., Face ID or fingerprint). The passcode acts as a backup in case biometrics fail or are not available.
- Now you are signed in and have access to your dashboard.
2. Dashboard
When you first log in, you’ll be taken to your dashboard.
In the Updates section, you’ll find information about your expense claims and any approval or authorisation requests.
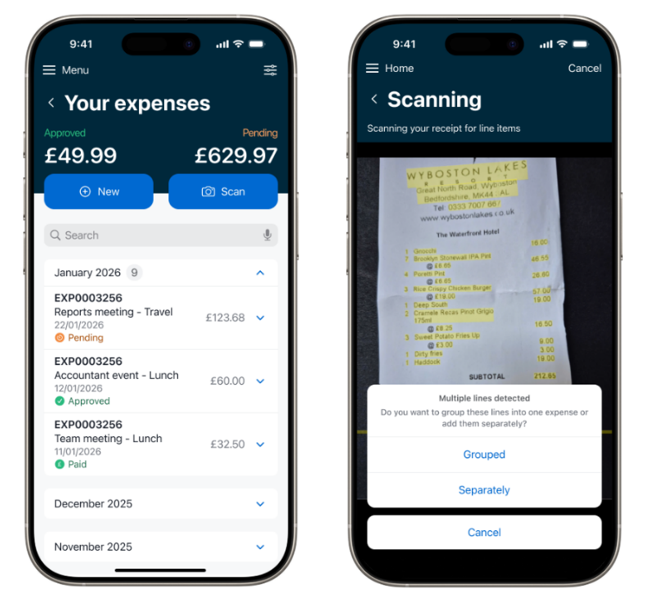
Below that is the Your Expenses section, which gives you an overview of your expenses from the past 30 days - including approved and pending claims.
Finally, all users will see the Approvals section in the Dashboard. If you have permission to approve expenses, any pending claims awaiting your review will be displayed here. If you’re not an approver, the section will still be visible but will show no values.
Click on any of these sections to view more detailed information.

2. Creating an Expense
Click on Your expenses from the dashboard. Then you can either create New or use the Scan option.
2.1 Creating an Expense via the "New" Button
This method is for manually entering expense details.
1. Tap the New button.
2. You’ll be taken to the Create Expense form.
3. Fill in the fields on Step 1 screen (note some fields might be already pre-field):
- Title – name your expense claim.
- Amount – Enter the total cost of the expense.
- Type of claim – Staff expenses, Credit card, etc.
- Claim Date – This is the date of when you are submitting your claim.
- Attach receipt – attach a picture of a receipt for the overall expense (optional).
4. On the Step 2 screen fill in the fields related to each expense line:
- Data of expense – data when your expenses occurred
- Expense type – select from the available list the type of expense.
- Unit price – enter the price of your expense.
- Attach receipt – attach a picture of a receipt for the line in question.
- Description – Add a brief explanation of the expense line in question.
5. Review the information and click next.
6. If required, you can add more lines to the same expense claim by clicking the Add line button on the Step 3 screen. You will be able to see all the lines you have added to your expense claim before clicking submit.
7. Tap Submit to send the expense for approval or save as draft to continue later.

2.2 Creating an Expense via the "Scan" Button
This method uses receipt scanning to auto-populate expense details.
1. From the Your Expenses section, tap the “Scan” button.
2. The app will open your camera, or you can choose a picture from the library.
3. Take a photo of the receipt.
4. The app will process the image and extract key details:
- Amount
- Merchant
- Date
5. If the receipt contains multiple lines, you can choose whether to group them into a single document line or create separate document lines.
6. A new expense document will then appear with pre-filled fields based on the scan.
7. Review and edit any fields as needed:
- Add or adjust the category, description, etc.
- Add more lines if needed.
8. On the Review screen (Step 3) you can scan additional receipts to create additional lines within the expense you have already started to create.
9. Optionally, attach the scanned receipt if not already linked.
10. Tap Submit to send the expense for approval or save as draft to continue later.
2.3 Mileage Calculator on Expenses
The Mileage Calculator helps users accurately log travel-related expenses based on distance travelled.
1. Start a new expense and select Mileage as the expense type.
2. Open the Mileage Calculator.
3. Enter Trip Details:
- Start Location: Type the address or use GPS to auto-fill.
- End Location: Type the destination address.
- The app will calculate the distance in miles/km automatically.
- Add any additional stops if needed.
4. Review Calculated Distance:
- The app displays the total mileage.
- You can manually adjust the distance if needed.
5. Rate per Mile/KM:
- The app may auto-fill the reimbursement rate (e.g., £0.45/mile).
- Confirm or edit the rate if your policy allows.
6. Add Description and Attachments:
- Provide a brief description of the trip (e.g., “Client visit in Manchester”).
- Attach any supporting documents if required (e.g., meeting confirmation).
7. Tap Submit to send the expense for approval or save as draft to continue later.

4. Using Filters
- Go to the Your Expenses list.
- Tap the Filter icon.
- You can filter by status (pending, draft, approved, etc.) or by date.
- Apply the filter to view results.
- You can also use the search bar to locate a particular expense.

6. Approvals
To approve or reject expenses:
- Navigate to the Approvals section from the dashboard.
- Tap on an expense awaiting your action.
- Review the details and attachments.
- If clarification is needed or you're rejecting the expense, you can add a comment explaining your decision.
- Tap Approve or Reject. The user will receive a push notification with the outcome.
- Optionally, add a comment or reason for rejection.

7. Profile settings and & Push notifications
Clicking on your initials in the top-right corner opens your profile settings. From here, you can update your bank details, customise the app’s appearance, adjust your security preferences, and manage notifications. You can set up your app to receive notifications when something requires your approval, or when an expense has been responded to by the designated approver.
