This article covers how to set up prepayments and deferred income in iplicit. Prepayments apply to the Purchase Ledger - they spread a purchase cost across periods. Deferred income applies to the Sales Ledger - it spreads recognised revenue across periods. Both use the same underlying automation mechanism, so the setup steps are identical in structure.
You do not create prepayment or deferred income documents manually. iplicit generates them automatically from a posted purchase or sales invoice, based on a distribution profile you select on the invoice line. The setup has five parts: configuring two GL accounts, setting up the account default, configuring the document type, creating the automation, and setting up the scheduler.
Understanding the two GL accounts involved
Before starting setup, it helps to understand that two separate GL accounts are involved in how prepayments and deferred income work in iplicit.
The first is the balance sheet holding account. This is a balance sheet account (for example, account 26000 'Deferred Income' or account 500 'Prepayment') that temporarily holds the full value when an invoice is posted. The balance is released from this account into the P&L account on each scheduled date. This account is set up in Account Defaults and does not appear on the invoice line itself.
The second is the P&L account (for example, a subscriptions income account or a prepaid expenses account). This is the account you select on the invoice line when entering the document. It needs the 'Deferred/prepayment' usage tick enabled so that the distribution profile column appears on that line, allowing you to set the schedule.
Both accounts need to be configured correctly. The holding account is where the balance sits. The P&L account is where the balance is released to over time.
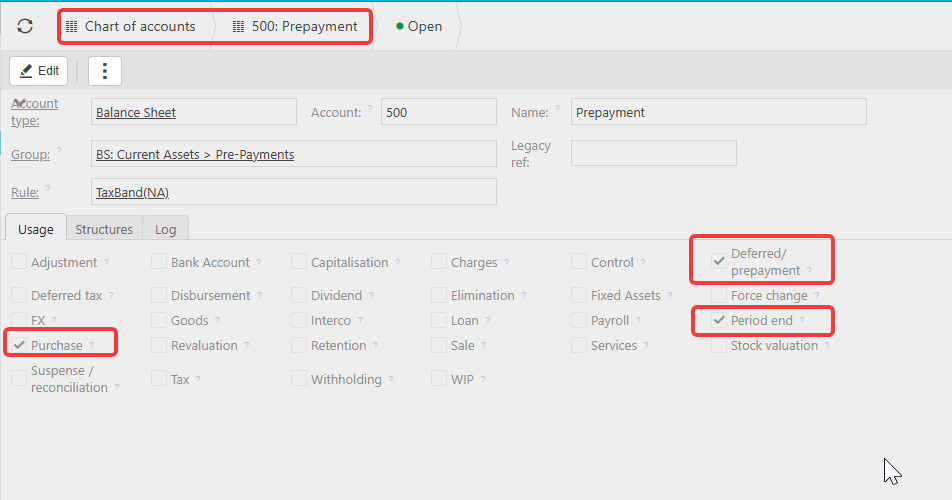
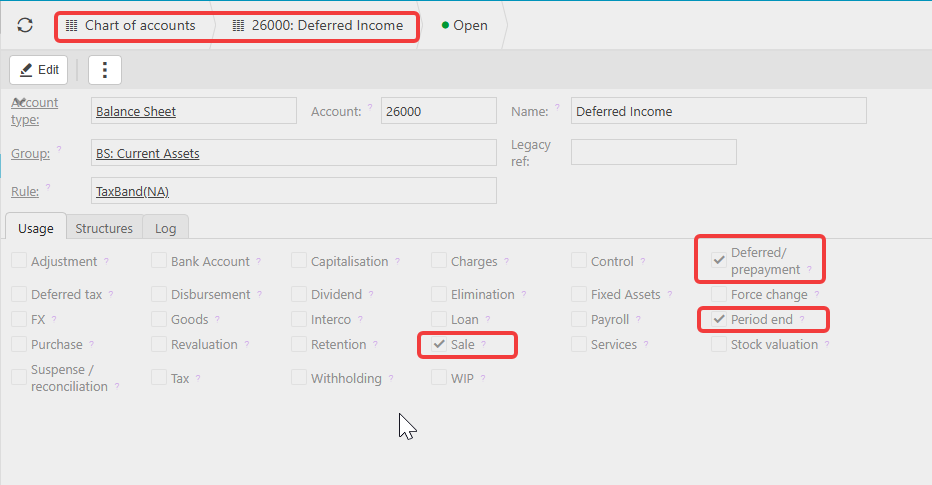
Step one - Configure the balance sheet holding account
This account holds the deferred or prepayment balance between releases.
Navigate to the chart of accounts and open the balance sheet account you want to use as the holding account. For deferred income this is typically a current assets or deferred income liability account. For prepayments this is typically a current assets prepayments account.
On the 'Usage' tab, ensure the following are ticked:
- Deferred/prepayment - makes this account available for selection in Account Defaults
- Period end - required for the automation to post to this account
- Sale - required for deferred income accounts
- Purchase - required for prepayment accounts
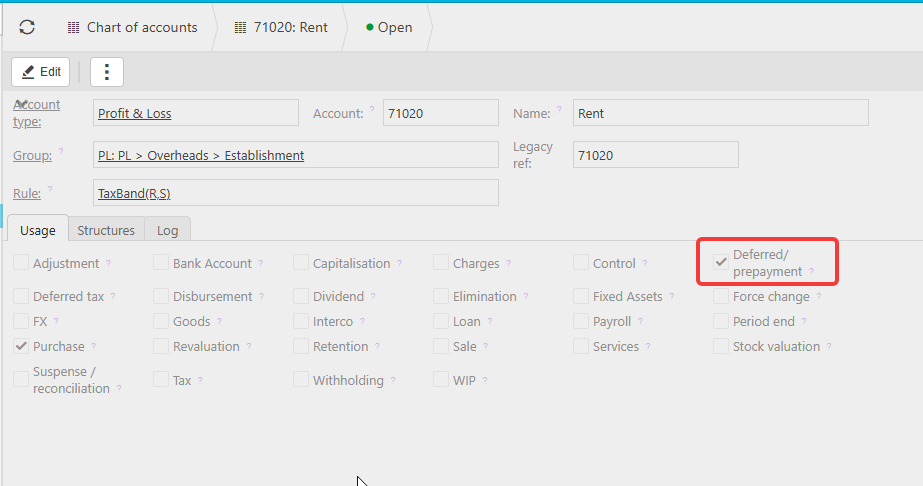
Step two - Configure the P&L account used on the invoice line
This is the account you will select on the invoice line when entering a sales or purchase invoice with a schedule.
Navigate to the chart of accounts and open the relevant P&L account. On the 'Usage' tab, tick Deferred/prepayment. This is the only tick required on this account for the distribution profile column to appear on the invoice line.
Without this tick the distribution profile column will not be visible on the invoice, even if everything else is configured correctly.
Step three - Set up the account default
Navigate to Account Defaults. Under the 'Period End' heading, open the 'Deferred Income' purpose.
Select the balance sheet holding account you configured in step one. This tells iplicit which account to use when moving the balance between periods.

Step four - Configure the document type
Navigate to Document Types. Two things need to be confirmed here.
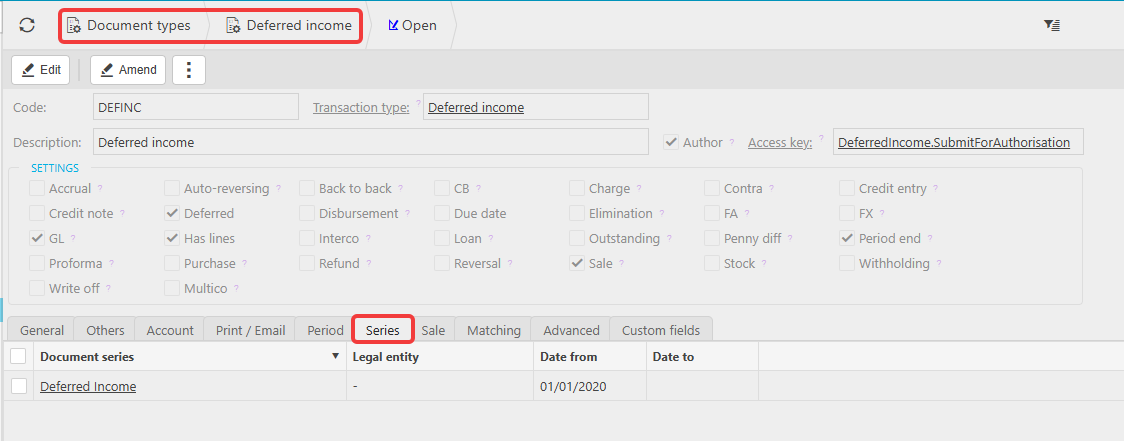
First, ensure the document type is unlocked. For prepayments this is the 'Prepayment' document type. For deferred income this is the 'Deferred Income' document type. To view locked document types, click the green dot next to the filter button. Locate the document type, select the three-dot menu and click 'Unlock'.
Once unlocked, confirm a document series is assigned. Click into the document type and open the 'Series' tab. If no series is listed, assign an existing series or create a new one. Without a document series iplicit cannot assign a reference number to the generated documents.
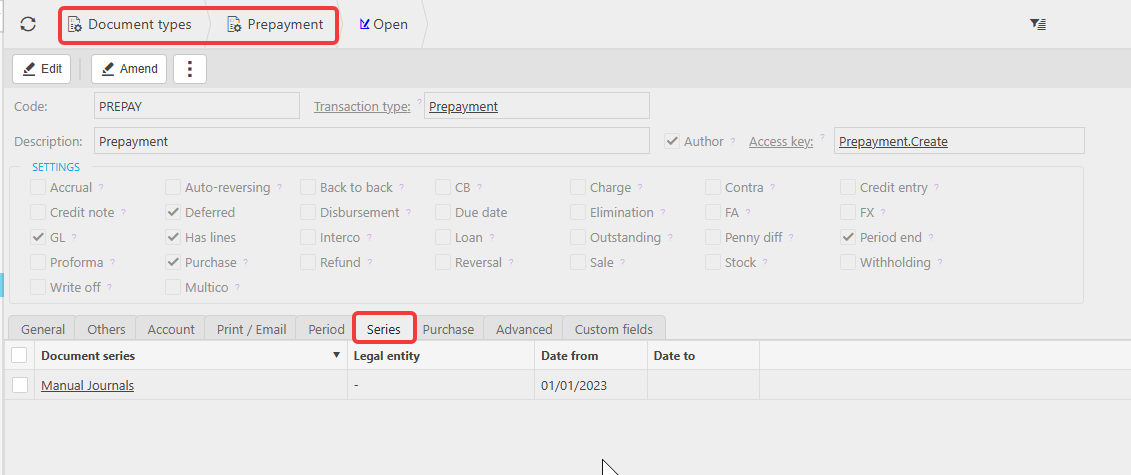
Second, enable the setting on each invoice document type you intend to use:
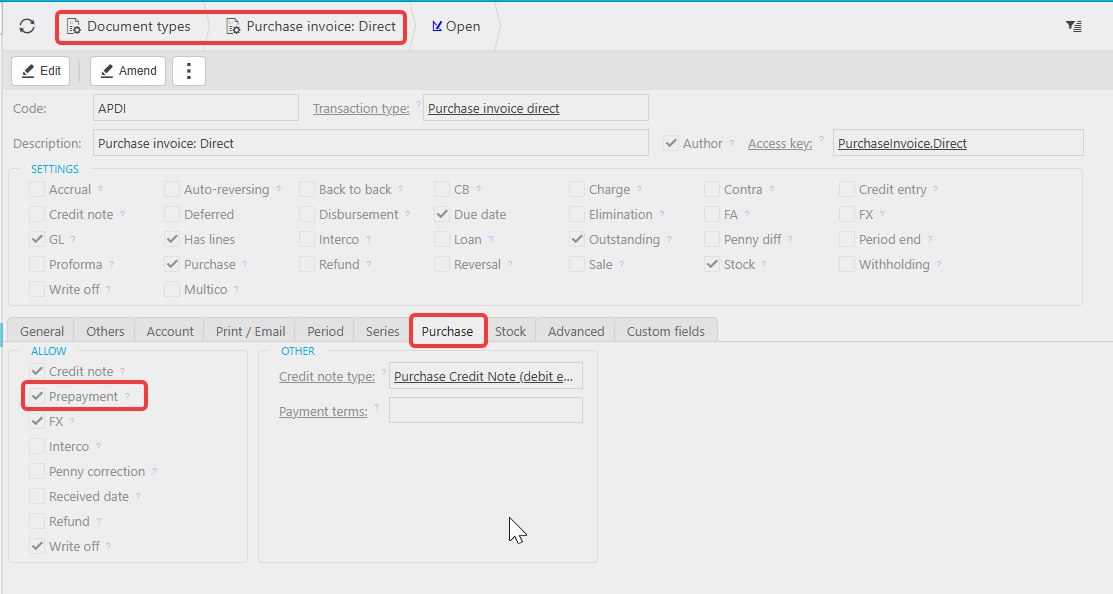
- For prepayments - open each purchase invoice document type and tick the 'Prepayment' box on the 'Purchase' tab
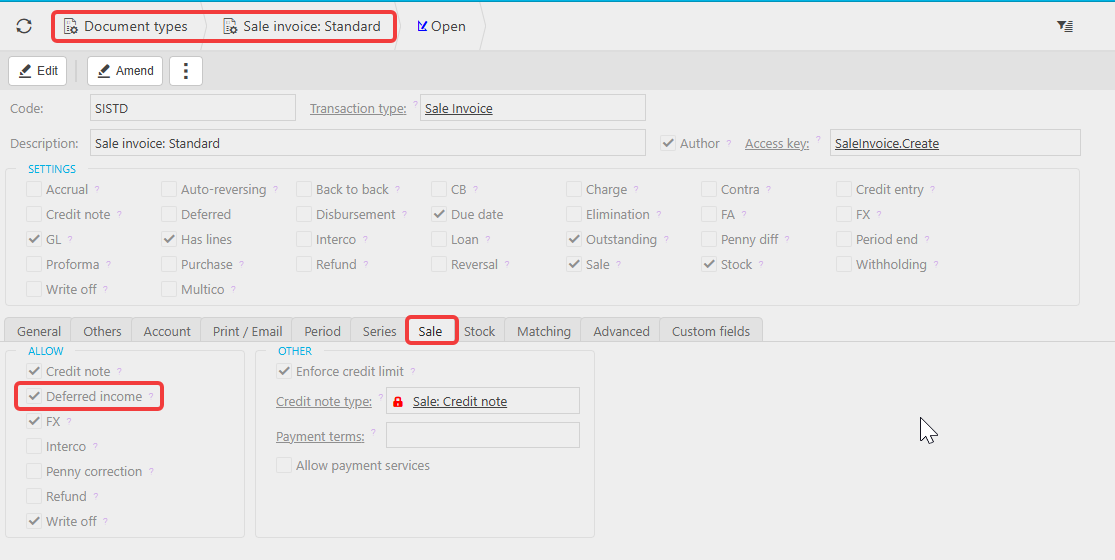
- For deferred income - open each sales invoice document type and tick the 'Deferred' box on the 'Sale' tab
You must do this for every document type you intend to use. If you have more than one purchase or sales invoice document type, each one needs the setting enabled individually.
Step five - Configure Environment Defaults
Navigate to Settings > Environment Defaults.
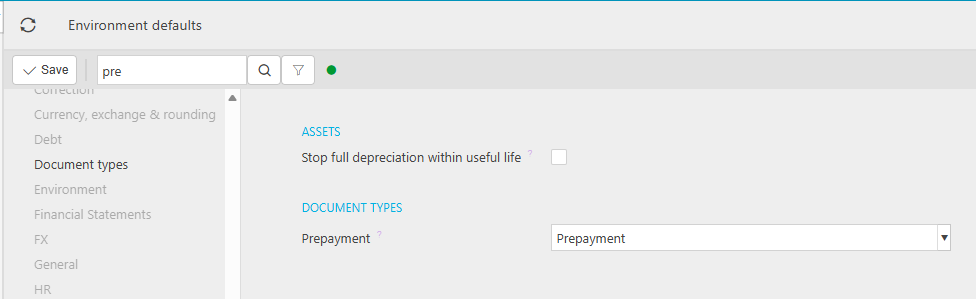
For prepayments, select the 'Document types' tab and select the 'Prepayment' document type from the dropdown. Save.
For deferred income, select the 'Sales' tab and select the 'Deferred Income' document type from the dropdown. Save.
Reload your iplicit session after making these changes to ensure they take effect across the environment.

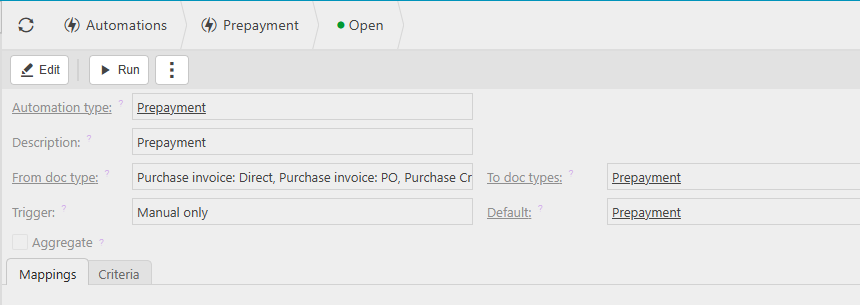
Step six - Create the automation
Navigate to Automations. Check whether a prepayment or deferred income automation already exists. If one does not exist, create a new one.
For the prepayment automation:
- Enter 'Prepayment' as the description
- Set 'From doc type' to the purchase invoice document types you want prepayments to apply to - select all relevant types
- Set 'To doc type' to the 'Prepayment' document type
- Set the 'Default' dropdown to 'Prepayment'
- Add any criteria in the 'Criteria' tab if required, then save.
For the deferred income automation:
- Enter 'Deferred income' as the description
- Set 'From doc type' to the sales invoice document types you want deferred income to apply to - select all relevant types
- Set 'To doc type' to the 'Deferred Income' document type
- Set the 'Default' dropdown to 'Deferred Income'
- Add any criteria in the 'Criteria' tab if required, then save.
Note: the 'automatic upon posting' trigger only creates journals up to and including the invoice post date. Future-dated journals in the schedule are only created when the scheduler runs.

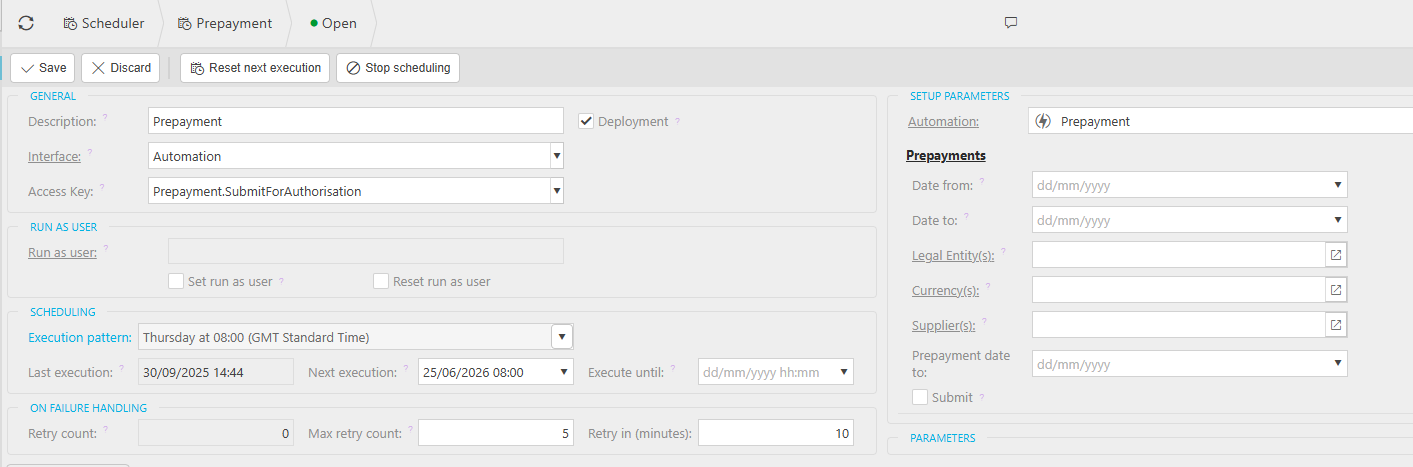
Step seven - Set up the scheduler
The scheduler ensures that prepayment and deferred income journals scheduled for future periods are created automatically without needing to run the automation manually.
Navigate to Scheduler and create a new scheduler, if the scheduler is not already available.
For the prepayment scheduler:
- Description: Prepayment
- Interface: Automation
- Access Key: Prepayment.SubmitForAuthorisation
- Under Setup Parameters, link the scheduler to your prepayment automation
- Set the execution pattern to daily so that journals scheduled for different dates within a month are captured on the correct day
- The right panel allows optional filters: Date from, Date to, Legal Entity(s), Currency(s), Supplier(s), and 'Prepayment date to' - leave these blank to process all applicable records
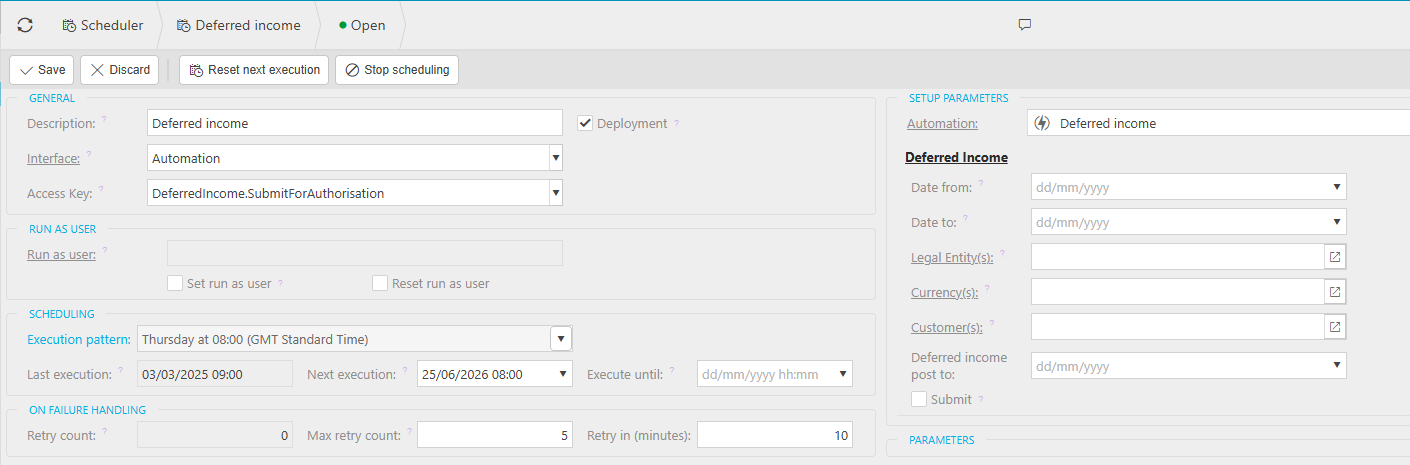
For the deferred income scheduler:
- Description: Deferred income
- Interface: Automation
- Access Key: DeferredIncome.SubmitForAuthorisation
- Under Setup Parameters, link the scheduler to your deferred income automation
- Set the execution pattern to daily
- The right panel allows optional filters: Date from, Date to, Legal Entity(s), Currency(s), Customer(s), and 'Deferred income post to' - leave these blank to process all applicable records
Important: the scheduler will fail if it attempts to create journals for a locked period. This is most common at the start of a new month when the new period has not yet been opened. Ensure periods are unlocked before the scheduler runs.
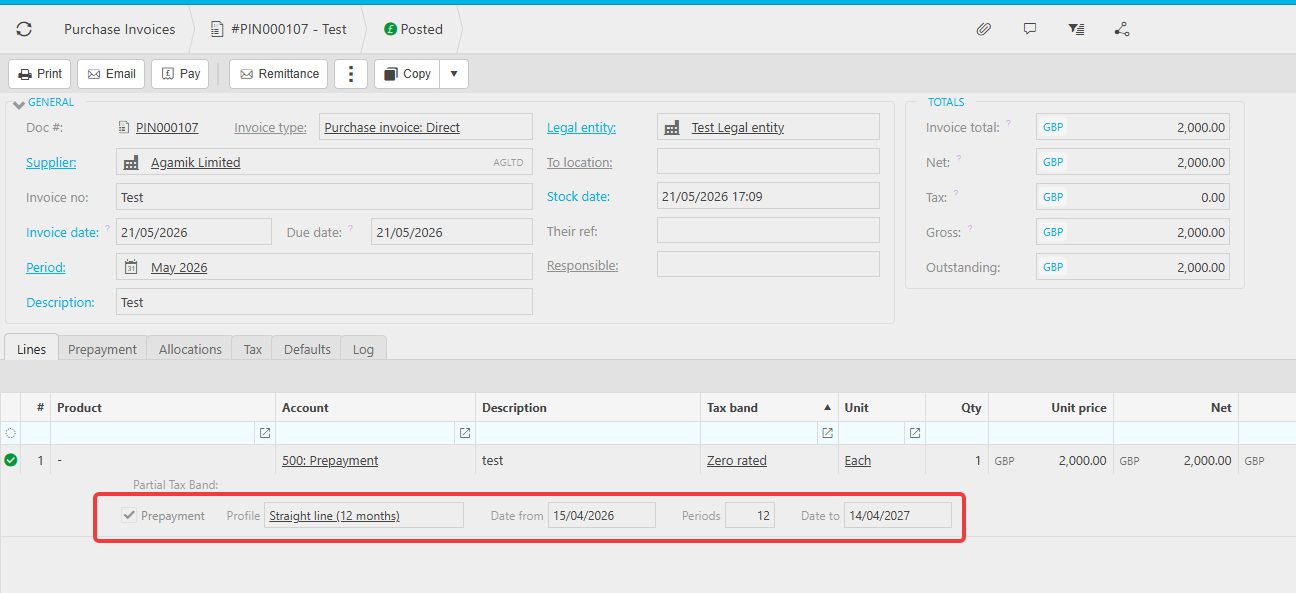
How prepayments and deferred income appear on an invoice
Once setup is complete, open a purchase invoice (for prepayments) or sales invoice (for deferred income). On a line where you select a P&L account that has 'Deferred/prepayment' ticked in its usage settings, a 'Distribution profile' column appears. Select the distribution profile that matches the period spread you need and enter the start and end date.
Post the invoice. iplicit generates the journals automatically, posting the full value to the balance sheet holding account. The scheduler then releases the value from the holding account to the P&L account on each scheduled date.
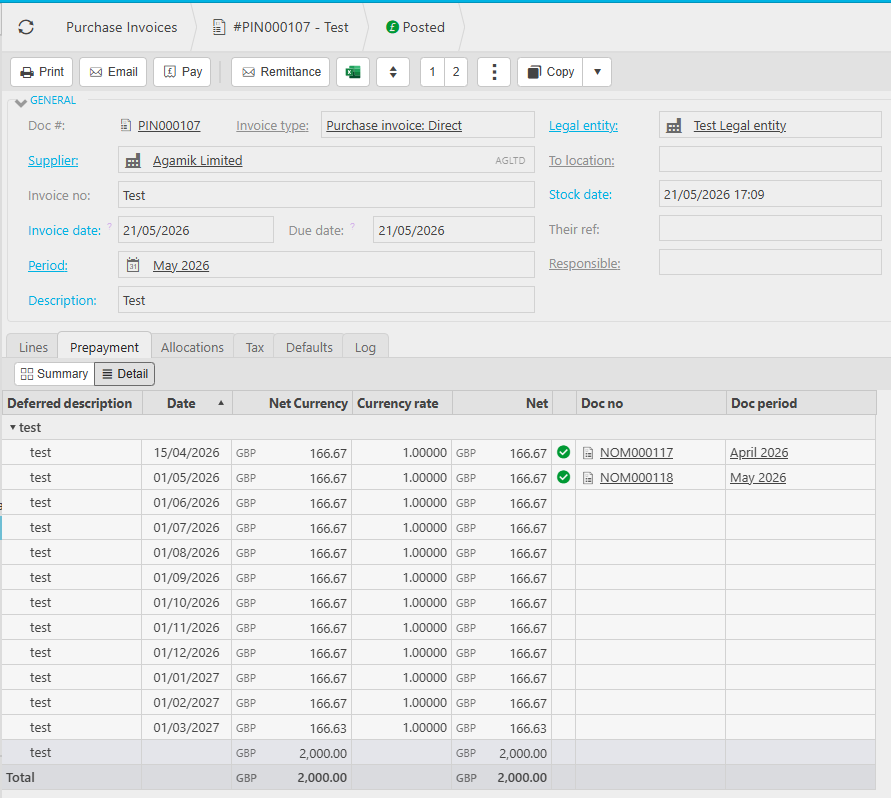
After posting, a 'Prepayment' or 'Deferred' tab appears on the invoice showing the full release schedule, which periods have been fulfilled, and which are pending. Select 'Detail' to see each linked document per period. Use the 'Links' button at the top of the invoice to view all linked documents.
Custom distribution profiles can be created if the standard options do not meet your requirements.
Prepayments
Deferred Income
Purchase Ledger
Sales Ledger
Automations
Document Types
General Ledger
Scheduler
Chart of Accounts
Account Defaults